We will need to use the following allowable limits:
 is the maximum allowable compressive stress in the concrete immediately after transfer and prior to losses
(1) 
 is maximum allowable tensile stress in the concrete immediately after transfer and prior to losses
(2) 
for simply supported members at the supports,
(3) 
 is maximum allowable compressive stress in the concrete after losses at service-load level
(4) 
 is maximum allowable tensile stress in the concrete after losses at service-load level
(5) 
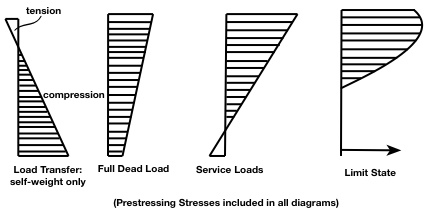
What has been left out in the simplified equations so far are the intermediate analysis checks that are required. It has been mentioned on a couple of occasions so far, that there are two values for  (
( and
and  ). There are a lot more values in between, but these two will govern. It makes intuitive sense that if the beam is fully loaded, then the beam will deflect more, hence larger compressive and tensile (if present) stresses will result, if, the tendon force is rather than
  . So, it is conservative to use the smaller for a fully loaded
  condition (i.e. self-weight + superimposed dead load + live load).
However, what about at an intermediate loading stage, such as a time when there is more compression on the bottom fiber than the top fiber? A realistic scenario could be that the beam is prestressed, and no load except the self-weight is applied. Shrinkage and other factors have not yet occurred in the beam, so the tendon is still stressed to (not ) .
The more conservative value of to use in this condition ( only) is to use .
Let’s investigate this further:
By setting the expressions equal to  , as shown, we have enough information, just using geometry, to determine that must be satisfied.
These expressions for  and
and  will be independent of and
  !
!
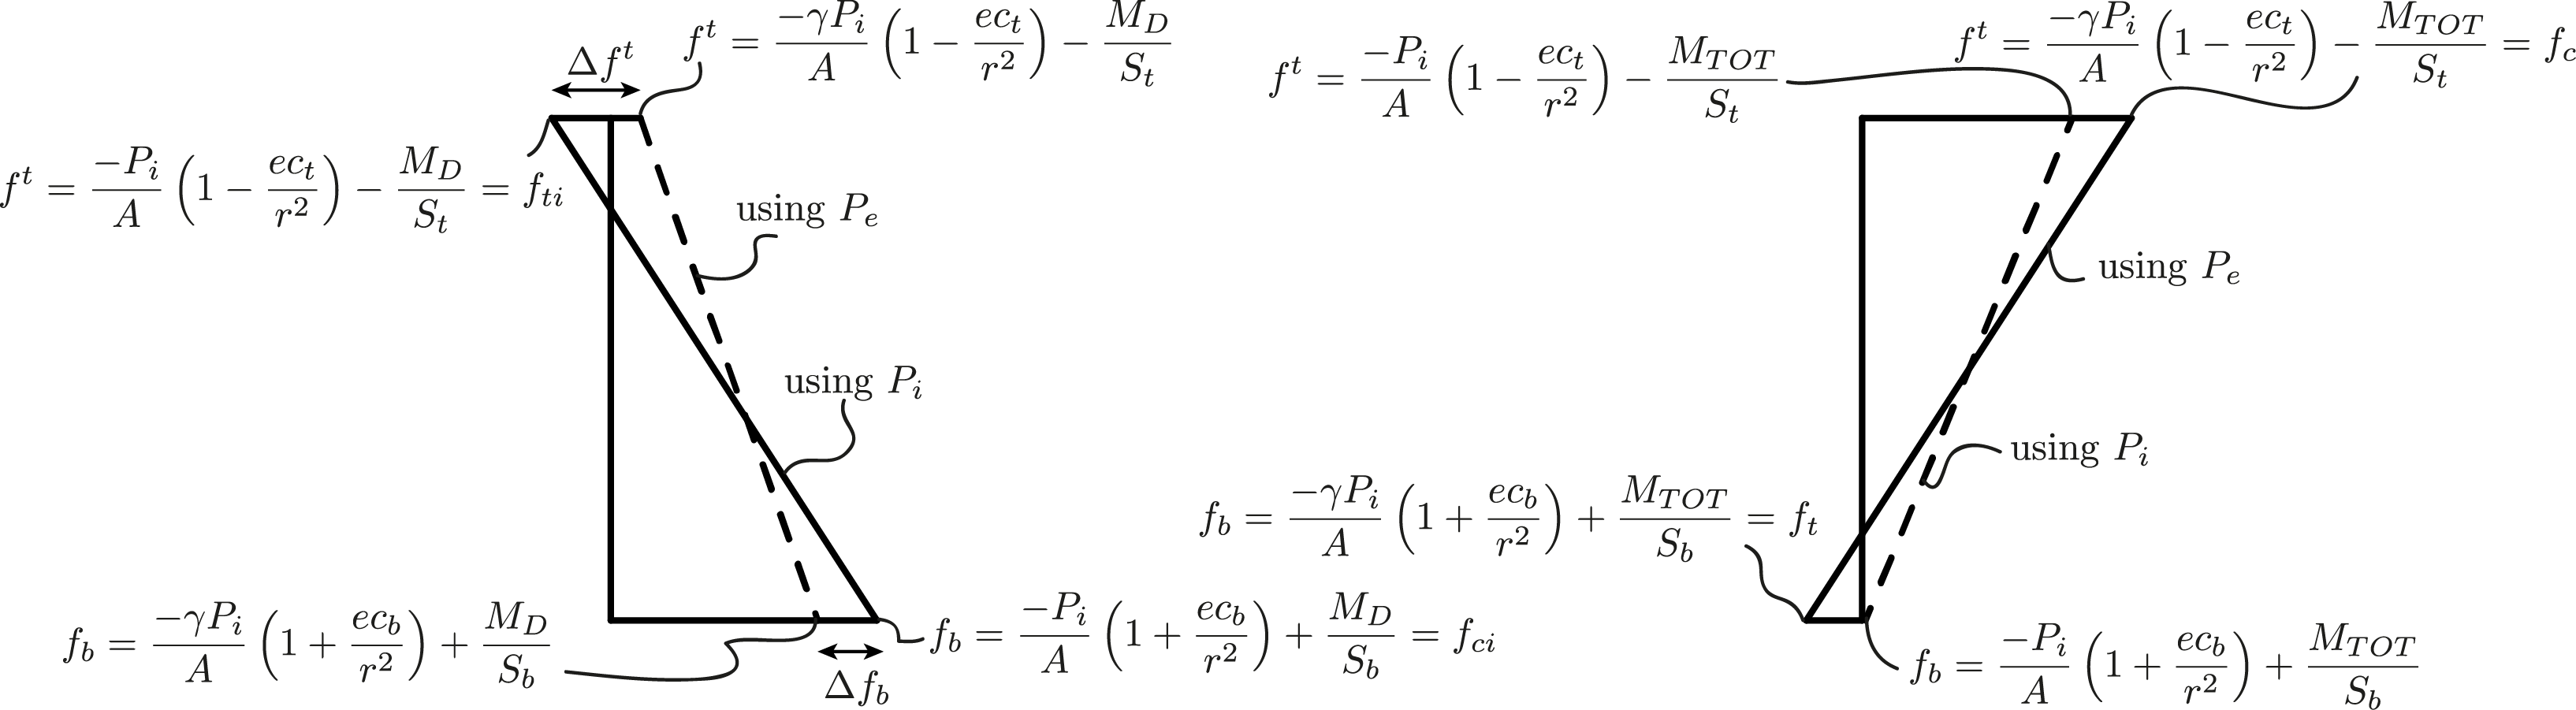
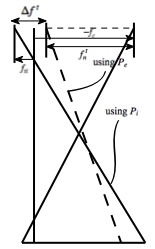
(6) ![\begin{equation*} \Delta f^t = \left[\frac{-P}{A} \left(1-\frac{ec_t}{r^2}\right)- \frac{M_D}{S_t}\right] - \left[\frac{-\gamma P_i}{A} \left(1-\frac{ec_t}{r^2}\right)- \frac{M_D}{S_t}\right] \end{equation*}](https://utsv.net/wp-content/ql-cache/quicklatex.com-653160016fca0bb5699ee891156054e6_l3.png "Rendered by QuickLaTeX.com")
We can take the “ ” out of our second term, and rewrite the second term as
(7) 
So,
(8) ![\begin{equation*} \Delta f^t = f_{ti} - \left[\gamma(f_{ti}) + \frac{\gamma M_D}{S_t} - \frac{M_D}{S_t}\right] = f_{ti} + \frac{M_D}{S_t} - \gamma(f_{ti}) - \frac{\gamma M_D}{S_t} = (1-\gamma)(f_{ti} + \frac{M_D}{S_t}) \end{equation*}](https://utsv.net/wp-content/ql-cache/quicklatex.com-473d6a46cc8b1baaf7e2f262784e2039_l3.png "Rendered by QuickLaTeX.com")
Similarly, skipping the work,
(9) 
So, regardless of the values of and , the DIFFERENCE in stresses after prestressing losses ONLY depends on material, geometry, and applied moment.
( is negative, so ( ) is positive)
The “ ” in
” in  stands for “net”, and
  designates “top”.
So, with ,  positive, and negative:
(10) ![\begin{equation*} f^t_n = f_{ti} - \Delta f^t - f_c = f_{ti} - \left[(1-\gamma)(f_{ti} + \frac{M_D}{S_t})\right] - f_c \end{equation*}](https://utsv.net/wp-content/ql-cache/quicklatex.com-19fc4cd694c3282690e4f710bd769de7_l3.png "Rendered by QuickLaTeX.com")
(11) ![\begin{equation*} f^t_n = f_{ti} - \left[f_{ti} + \frac{M_D}{S_t} - \gamma f_{ti} - \gamma\frac{M_D}{S_t}\right] - f_c = \gamma f_{ti} - (1-\gamma)\frac{M_D}{S_t} - f_c (1)\end{equation*}](https://utsv.net/wp-content/ql-cache/quicklatex.com-2a894dfa16317202962da2b69c34eb9d_l3.png "Rendered by QuickLaTeX.com")
( and
and  are positive and is negative)
(12) ![\begin{equation*} f_{bn} = f_t - f_{ci} - \Delta f_b = f_t - f_{ci} - \left[(1 - \gamma)(-f_{ci} + \frac{M_D}{S_b})\right]\end{equation*}](https://utsv.net/wp-content/ql-cache/quicklatex.com-832809484df790211025793c108772ba_l3.png "Rendered by QuickLaTeX.com")
(13) ![\begin{equation*} f_{bn} = f_t - f_{ci}- \left[-f_{ci} + \frac{M_D}{S_b} + \gamma f_{ci} - \gamma \frac{M_D}{S_b}\right] = f_t - \gamma f_{ci} - (1-\gamma)\frac{M_D}{S_b} (2) \end{equation*}](https://utsv.net/wp-content/ql-cache/quicklatex.com-ea59e6ef6e7590392c9986e404b3eb5b_l3.png "Rendered by QuickLaTeX.com")
Again, we see that the DIFFERENCE in stresses between stages is independent of and
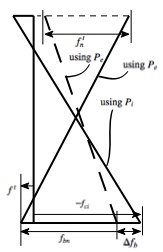
From inspection of the very first diagram, using what we know about the definitions of and  from the latter two diagrams, we can see that:
(14) 
(15) 
(16) 
(17) 
These expressions assume that the stresses at both the transfer and service stages are largest at a single point along the beam – i.e. at midspan for a simply supported beam with draped tendons.
If  and
and  , then whatever and that cause and in the intermediate stage, will cause and at the full service load stage, when
  and
and  are added, and becomes . Any and
  and
and  are obviously conservative (i.e. and that cause and in the intermediate stage, would have stresses less than and at the full service load stage).
For a continuous beam, one would need to evaluate the above two expressions for the midspan and for the support (i.e. two sets of expressions) and use the largest set of values, keeping in mind that “” is in fact  for a typical interior support and would be
  for the interior support. This is due to the fact that the applied loads would produce negative moment, and so the tendon would be draped so as to be located within the upper half of the section, at the interior supports.
The above two expressions would really only apply to a continuous beam in the circumstance where a single “set” of expressions controls (either at midspan or at the support). If, say, the midspan controls at transfer and the support controls at service loads, then the above expressions may either be too conservative or too aggressive. Regardless, the above equations are a good starting point, though rules-of-thumb are equally effective in some cases.
Note: the self-weight of the structure () depends on  , thus, the above equations aren’t perfect even for a simply supported beam with draped tensions, which is essentially the assumed geometry under which the above equations were derived.
For a simply supported span with straight tendons, most likely, the support stresses at the transfer stage would control at the transfer stage, and the midspan stresses would control at the service load stage. This is analogous to the scenario mentioned previously, regarding a continuous beam where the midspan controls at transfer and the support controls at service loads. For a continuous beam, developing new expressions for and would be cumbersome. For a simply supported beam with straight tendons, we can simply eliminate the term from  and
and  since the stresses at the support at the transfer stage ONLY result from prestressing. The self-weight moment (and applied moments from gravity) is zero at the pinned supports. Stresses at midspan resulting from
  are still assumed to govern at the service load stage, but
  and
and  now include an term, since the terms no longer cancel.
Thus, we arrive at the following two expressions for a simply supported beam with straight tendons (often used in parking garages):
(18) 
(19) 
These expressions assume that the stresses at transfer control at a point along the beam where there is no external moment and the stresses at service control at a different point along the beam, where there is moment – i.e. a simply supported beam with straight tendons.